Mazel Tov!

In my novel, The Secrets of Dr. John Welles, Samuel Feldman married the love of his life, Abigail Cohen, in May of 1935. His two best friends, John Welles and Claude Willoughby, stood for Sam as his best men. The occasion brought the three friends together after a long separation due to emotional trauma Claude had endured during their college years. John and Claude had enjoyed Sam’s Jewish heritage during Chanukkah, but their participation in Sam and Babby’s wedding would draw them in even closer. It was unlike anything John and Claude had ever experienced.

Historical Ketubah

The signing of the ketubah was the first ritual to involve John and Claude. An ancient document, the ketubah is a marriage contract of sorts that specifies the groom’s commitments to the bride. It is signed by two appointed Jewish witnesses who must not be family members related to the bride and groom by blood. Scandal of scandals: neither John nor Sam was Jewish. As readers will find upon publication of my novel, the lovely Abigail Cohen was one for breaking tradition. She knew how much Sam’s two best friends meant to him. In the eyes of the bride and groom, they were family, and therefore they had the honor of signing the marriage contract. This small detail would make the newlyweds ketubah, a work of art in itself to be framed and hung in their new home, that much more meaningful.

The second ritual, called the badeken, happens right after the witnesses sign the ketubah. The badeken is when the groom covers the bride’s face with her veil. Different sources cite different accounts in the Bible as the reason for this with one explanation claiming it had to do with Rivkah (Rebecca) veiling herself when she first saw Yitzchak (Isaac), another said it was in reference to the heavily veiled Leah during her marriage to Yaakov (Jacob), and another said it was a combination of both incidents. The badeken ceremony can be quite emotional as the bride and groom may not have seen each other for twenty-four hours or as long as one week until this moment.

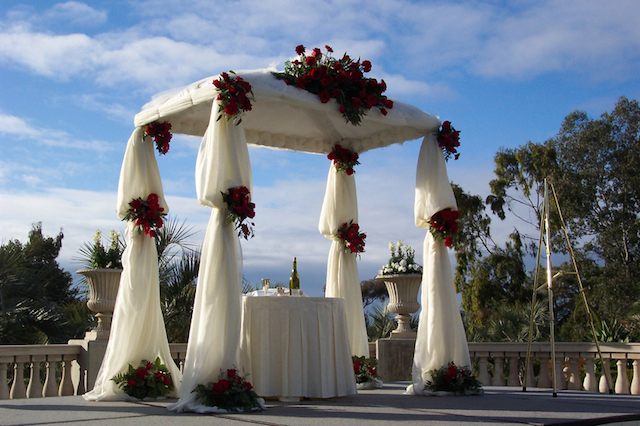
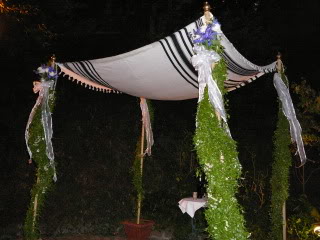
At this point, the wedding party enters the main ceremony where all the guests are seated. They proceed toward the focal point of the ceremony: the chuppah. I’ll direct you to The Hoopla About Chuppahs to find out how they figure in the Jewish wedding ceremony.

While beneath the chuppah, the bride circles the groom seven times. This beautiful ritual is reminiscent of the Israelites seven trips around the walls of Jericho. On completing the seventh lap, a miracle occurred when the walls of the city tumbled down, and the Israelites were able to capture the city. Every man is like the city of Jericho with a wall built around his heart. Men are often taught to hide their feelings, portray an exterior of impenetrability, and appear as if they have it all figured out. These elaborate defenses hide any sign of weakness or vulnerability as well as guard their deepest secret: they are sensitive and humble, simple and soft inside.

Along comes the wise woman who can pierce this defensive wall by surrounding her husband with the protective atmosphere of her love. She envelops him with affection, reassures him that he is her anchor, her center, and the focal point of her life. By doing so, he feels safe and comfortable, and the walls protecting his heart tumble down for her.

Two cups of wine are used during the wedding ceremony. The first cup accompanies the betrothal blessings and is recited by the rabbi. Afterward the reciting, the couple drinks from the cup. The betrothal blessings express the resolve of the groom and bride to create a Jewish home dedicated to Adonai and the wellbeing of all humanity.

A Jewish marriage becomes official when the groom gives an object of value to the bride. Traditionally, this is done with a ring that is totally plain without stones or marks. It is hoped that the marriage will be one of simple beauty the same as the ring. This is another place where I had my characters break with tradition ever so slightly. Sam’s father, Ezra, was a jeweler of unparalleled skill, and for the wedding of his youngest son, he created a wedding band with his blessing hand carved into the gold.

Upon exchanging of the rings, the couple declares their betrothal to each other. The words “by this ring you are consecrated to me according to the Law of Moses and Israel” form the essence of the marriage service. The ring, an unbroken circle, symbolizes the eternal nature of the marriage covenant. Then the ketubah is read and given to the groom to hand to his bride. She holds on to it for all the days of their marriage as it is her property and has the standing of a legally binding agreement.

The Sheva Brachot, or Seven Blessings, are then recited over the second cup of wine by the rabbi, cantor, or other people wishing to honor the happy couple. These ancient blessings place the bride and groom into a wider social and sacred setting. After these blessings, the bride and groom share a second cup of wine.

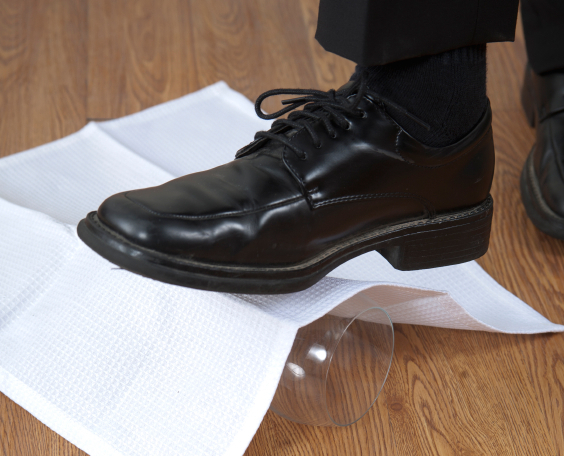
The most familiar tradition in a Jewish wedding is the breaking of a glass by the groom. This act concludes the ceremony and signals the guests to shout Mazel Tov, cheer, dance, and start partying. Some of the explanations behind the smashing of the glass include:

  1. To show that life holds sorrow as well as joy
  2. A reminder that marriage will change your life forever
  3. Symbolizes the destruction of the temple in Jerusalem approximately 2000 years ago
  4. It’s a break with the past, and the marriage will last as long as the glass remains broken
  5. Symbolizes what is broken in society
  6. A superstition that the loud noise will drive away evil spirits
  7. It’s a time to focus prayers and energies on a specific brokenness that needs repaired
  8. A hope that the couple’s happiness will be as plentiful as the shards of glass or their children as numerous as the shards of glass
  9. It’s a representation of the fragility of human relationships

The last part of the service occurs when the newlyweds separate from where the ceremony took place. During the yichud, one of the most intimate and private parts of the day, the bride and groom are required to have time alone away from family and guests to reflect on their marriage. In times past, the marriage would have been consummated during the yichud. Afterward, the new couple would join the party.

Mazel Tov!

The Hoopla About Chuppahs

Beautiful white chuppa with red flowers for outdoor wedding ceremony.

When John Welles’s best friend, Sam Feldman, invited him to a party Sam’s mother was hosting, John was not at all enthused. Sam, who always had a girlfriend on his arm, wanted John to run interference for him as he dodged the girl his mother wanted him to meet. Little could either young man have predicted how captivating Abigail Cohen, called Babby, would prove to be. Not only was Babby beautiful, the young school teacher was intelligent, articulate, and poised. John began to rethink his opinion about dating Babby, but not in time. By the end of the party, Sam and Babby hit it off exactly as Sam’s mother knew they would. John did not begrudge Sam his good fortune. Rather, he and Claude Willoughby were the best men at Sam and Babby’s wedding.

Being Jewish meant Sam and Babby took their vows under a chuppah. A chuppah is a Jewish wedding canopy with four open sides. There are many traditions surrounding the chuppah, and they have changed throughout the years depending on an orthodox or modern interpretation.

The chuppah is usually a square of cloth supported by four poles. The fabric can be as elegant as silk or velvet, as simple as cotton or linen, or as important as an heirloom piece of lace or tallit belonging to a family member. The poles can be free-standing or held in place by friends of the couple. Either way, the poles should touch the ground. It is a great honor to be asked to hold the chuppah poles, and this role is often given to people very close to the couple.

Many couples like to decorate the chuppah poles and tops to match the theme of their wedding. Whatever material is chosen, be sure that it will withstand unpredictable weather conditions if the ceremony is outdoors. Ruining a family heirloom or the collapse of an unsteady chuppah will definitely spoil the wedding.

the-hoopla-about-chuppahs-2The purpose of the chuppah is to symbolize the new home the couple will create. At one time, the cloth chuppah was draped around the bride and groom but was later spread over their heads. Ancient rabbis compared the chuppah to Abraham’s tent during Biblical times. Abraham was famous for his hospitality, and since his tent was open on all four sides, travelers could enter from any direction.

The bride and groom are brought to the chuppah by both parents. The space inside the chuppah should be big enough for the couple, clergy, and a small table for ritual items such as wine and glasses. The bride will also need enough room to circle her groom without tripping or snagging her dress. Don’t forget to make the chuppah tall enough for the tallest person to stand under without hitting the fabric where it will drag in the center. Family and friends in the wedding party, including parents, often stand outside the chuppah. Afterward, the new couple can receive guests in their chuppah as a symbol of the love and openness of the home they will build together.

‘Til Death Us Do Part

In the summer of 1964, Dr. John Welles and Bea Turner attended the wedding of a couple that never expected to marry. Many hardships had paved the way to the happy couple’s nuptials, but they put every adversity behind them as they celebrated their special day. Everything that came before their marriage and whatever would come after only served to strengthen the bond that existed between two people truly in love. All of Addison came out to join in the joyous occasion making it a day the bride and groom would never forget.

The wedding cake I had in mind for the couple had to be completely homemade. Box mixes wouldn’t do, and the grandiose cakes created by bakers to satisfy the whims of brides today wouldn’t be believable. Unfortunately, neither my mother nor I had a recipe for a homemade white cake. Scandalous, I know.

My Internet research led me to a website with a cake that, from the recipe, looked as if it would suffice. I don’t have a problem with giving credit and linking back to the originator of a recipe, so I contacted the owner of the site requesting permission to do so. Unfortunately, I never heard back, and I’m not a recipe thief. This forced Mom and me to rework the recipe to our liking and present it as our own. Not a problem since we always tweak a new recipe the minute we find it anyhow.

The most important requirement: the cake had to taste homemade. You wouldn’t think that would be a difficult task since we weren’t using a prepackaged mix, but our cake had to capture the essence of the above-mentioned scene. How does one bake hope, beauty, richness, longing, humbleness, elegance, era, location, and love into a cake? Follow our recipe and find out.

Timeless Wedding Cake

3 sticks unsalted butter, softened

3 c granulated sugar (I used raw necessitating the need to pulverize the larger crystals in a food processor to ensure incorporation during the creaming process. Don’t skip this step; it’s worth it. You’ll be glad you did once you taste the cake.)

5 eggs at room temperature

3 c flour and more for dusting the cake pans

¼ t salt

2 t baking powder

½ c buttermilk at room temperature

½ c whole milk at room temperature

2 t vanilla extract –OR– 1 t vanilla and 1 t lemon

Preheat your oven to 350° F. Spray three nine-inch round cake pans with nonstick spray and dust evenly with flour. Make sure to coat all the edges, and tap out any excess flour.

In a stand mixer, cream the softened butter and sugar until it is very light in color and fluffy. Add the eggs one at a time taking care not to over beat after each addition or you’ll end up with a tough cake.

Combine the milks and vanilla in a glass measuring cup and whisk. Sift the flour, baking powder, and salt together. Add the dry ingredients to the butter/sugar mixture alternately with the wet ingredients. Begin and end with the dry ingredients. A rule of thumb for this process is to add one-third of the dry ingredients, one-half of the wet, another third of the dry, the remaining half of the wet, and the last third of the dry.

Mix on a medium speed until well combined, taking care to stop the mixer and scrape down the sides of the bowl as needed. Evenly distribute the batter between the three cake pans. The batter will be thick, almost like a pound cake batter, so use an off-set spatula to level the tops. All three cakes should bake on the same level of your oven, somewhere near the middle. Carefully shift position of the pans from front to back midway through baking.

Bake for 25 to 30 minutes, or until a knife inserted in the center of the cake comes out clean. The top of the cakes should not jiggle, and a light crust will have formed on the top. Cool for five minutes in the pans, and then remove the cakes to a wire rack to continue cooling.

Bourbon Soaking Syrup

1 c water

1 c raw sugar

2 T bourbon (I recommend Woodford Reserve)

Combine the sugar and water in a large saucepan and bring to a boil over a high heat. When at the boil, the syrup is done. Remove from the heat and stir in the bourbon. Set aside to cool. The syrup will thicken as it cools. Brush the cooled bourbon syrup on the top of the cooled cake layers.  If you like thicker syrup, cook longer until more water has evaporated, but take care not to burn the sugar, or it will taste scorched.

Buttercream Frosting

1 c unsalted butter, softened

3 c powdered sugar

2 t vanilla extract

2 T whipping cream

In a stand mixer, cream the butter with one cup of powdered sugar on a low speed. Scrape the bowl as needed and add the remaining two cups, one at a time. Increase the speed to medium and beat for three minutes. Mix in the vanilla and whipping cream. Beat an additional minute, adding cream by the tablespoon if needed, to achieve a spreadable consistency.  If you enjoy a thicker layer of frosting between your cake layers, consider doubling the recipe.

Assembling:

Place one layer of completely cooled, bourbon-soaked cake on a stand or plate and ice the top of the cake to the edges. Place the second layer directly on top of the first and repeat the icing process. Add the final layer of cake and ice accordingly. Use the remaining frosting to ice the sides of the cake. The bourbon soak will add a layer of flavor and keep the cake moist longer.

I knew we had achieved success with our recipe when my sister-in-law took a bite and said, “Oh…this just tastes old-fashioned.”

Enjoy!

%d bloggers like this: