Welcome to The Apple Crate

welcome-to-the-apple-crateOne of the most well-known results of Prohibition was the speakeasy. In total rebellion against the laws meant to curb crime and drinking, speakeasies popped up almost everywhere from 1920 to 1933. According to one article I researched while writing my novel, The Secrets of Dr. John Welles, for every legal saloon operating prior to Prohibition, at least six speakeasies opened after Prohibition. With all that temptation, it was understandable that John and his two best friends, Sam and Claude, would end up in one of the illegal establishments pushing the boundaries of youthful adventure.  Here’s what I discovered while creating The Apple Crate, a speakeasy located below a grocery store owned by a gangster of my inventing, Leo Jenkins.

Like legal establishments and today’s clubs, some speakeasies offered entertainment in the form of singing or jazz bands. Entry into the club required knowledge of a password letting the doorman, often the owner or manager of the club, know that you weren’t law enforcement and to keep the government from finding the location. A personal introduction or presenting of a card may also have been required to ensure security against raids.

The term speakeasy came from a bartending term. To speak easy meant to act casually so as not to draw attention to oneself with quick, nervous behavior when purchasing illegal alcohol. Terms used to conceal the identity of bootleg liquor included coffin varnish, monkey rum, white mule, horse liniment, panther sweat, tarantula juice, and rot gut. Not very appealing names for the barely drinkable booze served, but it didn’t keep people from seeking out alcohol every chance they had.

Speakeasies were also known as a blind pig or blind tiger, but these terms were reserved for lower class establishments. There is debatable history surrounding these names. One story claims that entertainment involving pigs resulted in the first name. People supposedly paid to see the pig and a drink was thrown in for free. Blind tiger was purportedly the name used when the identity of the seller was concealed.

While gaining access to a speakeasy required connections, locating one probably wasn’t as difficult. They were everywhere in America and Canada, usually set up in stores and businesses, operating right next to or within legal establishments. Speakeasies were most common in New York where the famed 21 club had the extra security measure of safety switches meant to short circuit and deny access to all the of the doors that contained alcohol.

Because respectable women weren’t welcome in a public bar prior to Prohibition, many started flocking to speakeasies after the Eighteenth Amendment took effect. These women, easily recognized as flappers, would dance the night away to music performed by jazz bands.

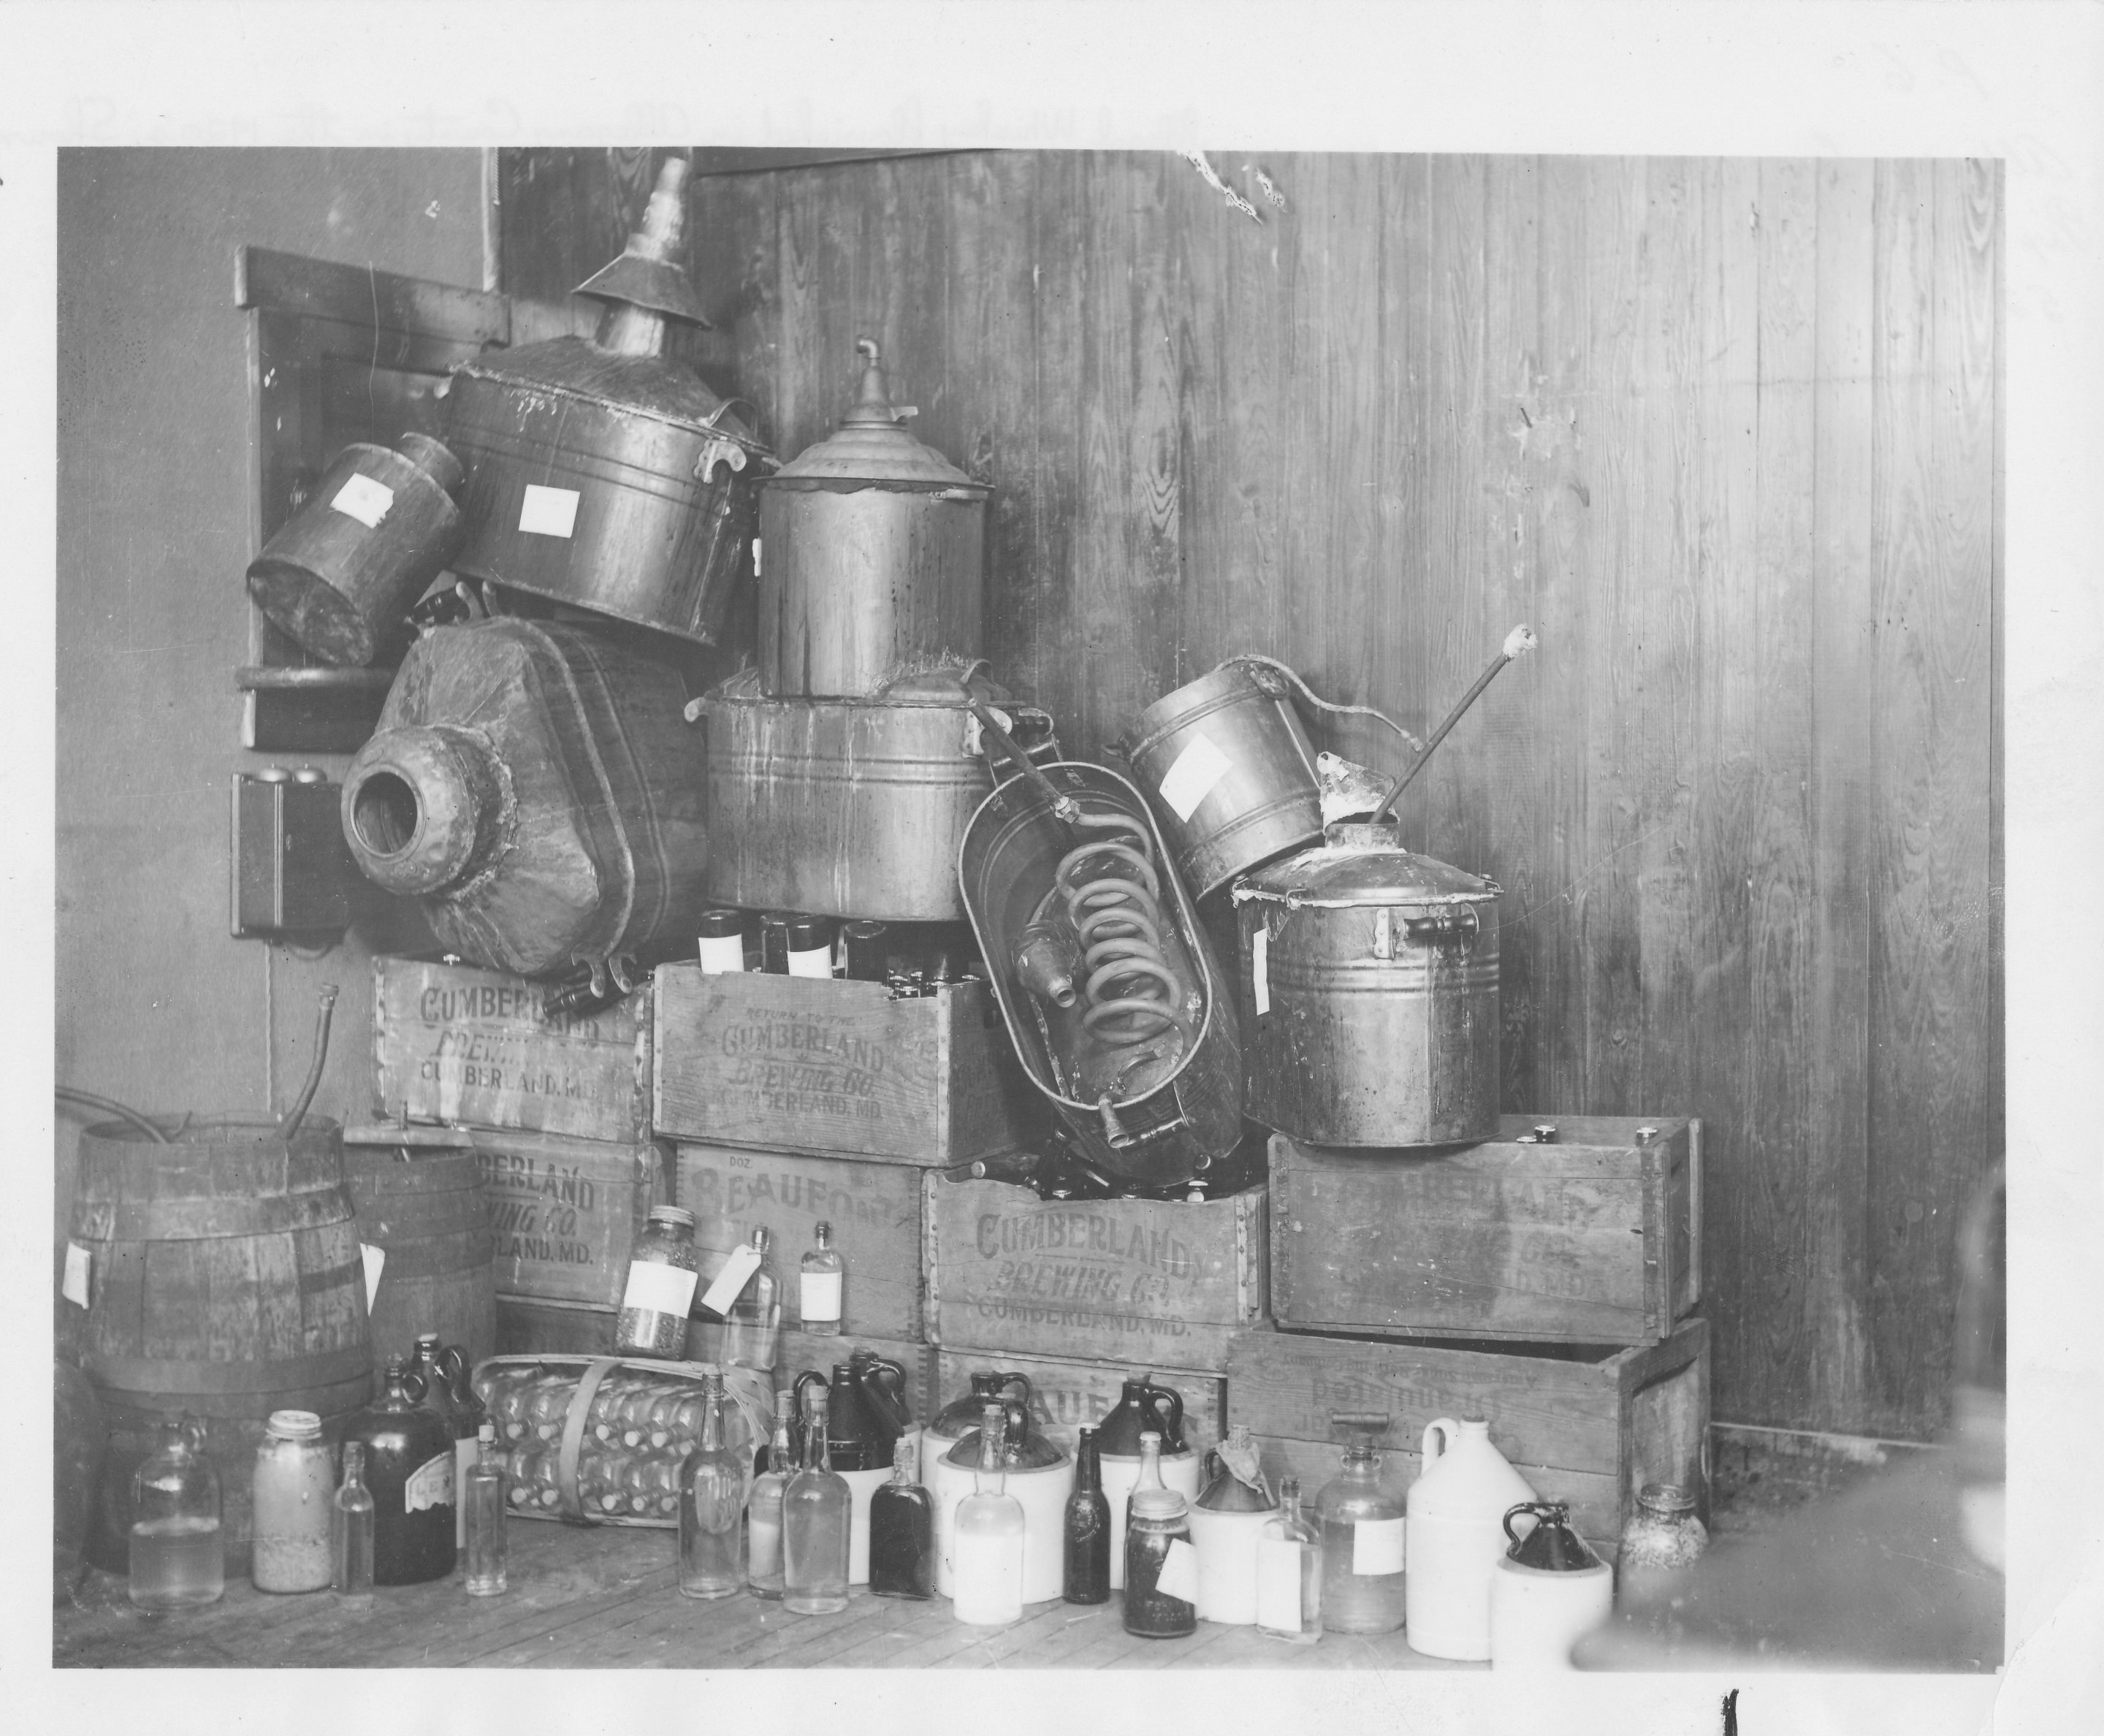
Gangsters were often associated with speakeasies, the most famous being Al Capone, but luckily John and his friends didn’t encounter any during their night out. Hustling illegal liquor was an extremely profitable venture for gangsters, and many became quite wealthy at it. Unfortunately, many regular people also became rich by supplying the demands of thirsty Americans.

Some of the crazier methods of transport included hip flasks, hot water bottles, false books, garden hoses, carriages with babies placed on top, carpenter’s aprons, coconut shells, and in one interesting case, eggs. Supposedly, a creative soul emptied the eggs of their true contents and refilled them with liquor.

The interior of a speakeasy could range from the extremely elegant to an unsophisticated hole-in-the-wall. Depending on the success of a particular speakeasy, drinks might be served in appropriate barware or from chipped mugs. In either case, people ranging from the famous, wealthy, and artistic to the downtrodden streamed to speakeasies during Prohibition. The only thing that went away with the repeal of the Eighteenth Amendment was the crime involved with selling alcohol. Well, most of it anyways.  (See:  By the Light of the Silvery Moon)

The Hoopla About Chuppahs

Beautiful white chuppa with red flowers for outdoor wedding ceremony.

When John Welles’s best friend, Sam Feldman, invited him to a party Sam’s mother was hosting, John was not at all enthused. Sam, who always had a girlfriend on his arm, wanted John to run interference for him as he dodged the girl his mother wanted him to meet. Little could either young man have predicted how captivating Abigail Cohen, called Babby, would prove to be. Not only was Babby beautiful, the young school teacher was intelligent, articulate, and poised. John began to rethink his opinion about dating Babby, but not in time. By the end of the party, Sam and Babby hit it off exactly as Sam’s mother knew they would. John did not begrudge Sam his good fortune. Rather, he and Claude Willoughby were the best men at Sam and Babby’s wedding.

Being Jewish meant Sam and Babby took their vows under a chuppah. A chuppah is a Jewish wedding canopy with four open sides. There are many traditions surrounding the chuppah, and they have changed throughout the years depending on an orthodox or modern interpretation.

The chuppah is usually a square of cloth supported by four poles. The fabric can be as elegant as silk or velvet, as simple as cotton or linen, or as important as an heirloom piece of lace or tallit belonging to a family member. The poles can be free-standing or held in place by friends of the couple. Either way, the poles should touch the ground. It is a great honor to be asked to hold the chuppah poles, and this role is often given to people very close to the couple.

Many couples like to decorate the chuppah poles and tops to match the theme of their wedding. Whatever material is chosen, be sure that it will withstand unpredictable weather conditions if the ceremony is outdoors. Ruining a family heirloom or the collapse of an unsteady chuppah will definitely spoil the wedding.

the-hoopla-about-chuppahs-2The purpose of the chuppah is to symbolize the new home the couple will create. At one time, the cloth chuppah was draped around the bride and groom but was later spread over their heads. Ancient rabbis compared the chuppah to Abraham’s tent during Biblical times. Abraham was famous for his hospitality, and since his tent was open on all four sides, travelers could enter from any direction.

The bride and groom are brought to the chuppah by both parents. The space inside the chuppah should be big enough for the couple, clergy, and a small table for ritual items such as wine and glasses. The bride will also need enough room to circle her groom without tripping or snagging her dress. Don’t forget to make the chuppah tall enough for the tallest person to stand under without hitting the fabric where it will drag in the center. Family and friends in the wedding party, including parents, often stand outside the chuppah. Afterward, the new couple can receive guests in their chuppah as a symbol of the love and openness of the home they will build together.

A Crazy Little Thing Called Cake

In May of 1951, Dr. John Welles attended the first birthday party of Patty Ann Hoffman whom he had delivered the year before. The doctor was friends of Patty Ann’s parents, Morris and Lorraine, but he also had a soft spot for the spirited little girl since the day she was born. For this reason, he willingly attended a child’s party.

The Hoffmans weren’t well off, but they made do with what they had. The ingredients for the cake Lorraine served were items she probably had on hand. Furthermore, as parents they would forgo the special treat of cake and ice cream to ensure plenty for their children and guests.

The cake I had in mind when I wrote this scene was a cake I grew up with: Crazy Cake. Also called Wacky Cake, this chocolatey cake had its origins during the Depression when milk, eggs, and butter were expensive. For this reason, you may know it as Depression Cake. I have found that most people are familiar with it by one of these names. A little ingenuity solved the problem of making cake without the pricey ingredients, and following generations were none the wiser.

img_20170205_182131906Because it is so rich and delicious, and because so many children these days have dairy and egg allergies, Crazy Cake is one of the old fashioned recipes to have survived until today. Even if one is financially stable, Crazy Cake is not to be missed.

Although Crazy Cake is tasty enough to eat plain or dusted with powdered sugar, I’ve provided a frosting recipe and a fudge recipe as toppings for the cake. The frosting is a titch more elegant if you’re serving the cake to guests. The fudge is the old fashioned kind that you can pour over the cake and allow to drip and puddle down the sides until it sets. There is no other way to describe this magnificent concoction other than to say it is a hillbilly delicacy. But then that’s where my experience with this cake has its origins.

One of the things you’ll find if you conduct your own research on Crazy Cakes is that they were often made right in the baking dish. All the dry ingredients were combined, and then three depressions were made in which the vanilla, vinegar, and oil were placed. The water was added, and everything was stirred into batter. I suspect because my mother learned how to make this in school, her recipe calls for greasing and flouring the baking dish. Either way, the results are the same. You’ll also find recipes for other flavors of Crazy Cake. I cannot testify to how good they are, and they do look good, but I can’t seem to make it past the chocolate version.

Enjoy!

Crazy Cake

1 ½ c flour

1 c sugar (I used raw)

3 T cocoa (heaping)

1 t salt

1 t baking soda

1 t vinegar (I used apple cider)

1 t vanilla

6 T oil

1 c water

Preheat oven to 350°. Grease and flour an 8 X 8 baking dish. Mix the dry ingredients. Add the wet ingredients. Stir thoroughly. Pour into the baking dish, and bake for 25 – 30 minutes. A knife inserted in the middle should come out clean. Cool completely in the baking dish before frosting. This recipe can be doubled and baked in a 9 X 13 baking dish.

Cocoa Frosting

4 c powdered sugar

¼ t salt

⅓ c cocoa

⅓ c unsalted butter, room temperature

⅓ c milk

1 t vanilla

Mix the powdered sugar, salt, and cocoa. Warm the milk slightly and add the butter and vanilla, then add to the dry ingredients and combine. Blend until it is smooth using either a stand or hand mixer.  This recipe is enough frosting for a 9 X 13 cake. Half it for an 8 X 8 or make two and fill in between the layers.

Old Fashioned Fudge

1 ½ c sugar (I used raw)

¼ t salt

⅓ c cocoa

¾ c whole milk

2 T unsalted butter

1 t vanilla

Mix the sugar, salt, and cocoa in a large saucepan. Add the milk and stir thoroughly. Cook over a medium heat, stirring constantly, until the mixture reaches a full, rolling boil. Boil without stirring until the mixture reaches 234° on a candy thermometer (the bulb of the thermometer should not rest on the bottom of the pan). If you don’t have a candy thermometer, after about twenty five minutes of boiling, test a small drop of fudge in ice water. The fudge should form a soft ball which flattens when removed from the water.

Remove from the heat and add the vanilla and butter. Do not stir. Rather, swirl the pan until the vanilla and butter are mixed in. Allow the fudge to cool to lukewarm (110° on a candy thermometer). Stir the cooled fudge with a wooden spoon* until it thickens and loses some of it gloss. Pour the fudge over the cooled Crazy Cake. Serve with vanilla ice cream or whipped cream.

*There is some debate on the Internet from professional cooking sites to blogs such as mine regarding the use of metal versus wooden spoons for stirring fudge. Both present logical arguments, however, I’ve used wood and metal with success.

‘Til Death Us Do Part

In the summer of 1964, Dr. John Welles and Bea Turner attended the wedding of a couple that never expected to marry. Many hardships had paved the way to the happy couple’s nuptials, but they put every adversity behind them as they celebrated their special day. Everything that came before their marriage and whatever would come after only served to strengthen the bond that existed between two people truly in love. All of Addison came out to join in the joyous occasion making it a day the bride and groom would never forget.

The wedding cake I had in mind for the couple had to be completely homemade. Box mixes wouldn’t do, and the grandiose cakes created by bakers to satisfy the whims of brides today wouldn’t be believable. Unfortunately, neither my mother nor I had a recipe for a homemade white cake. Scandalous, I know.

My Internet research led me to a website with a cake that, from the recipe, looked as if it would suffice. I don’t have a problem with giving credit and linking back to the originator of a recipe, so I contacted the owner of the site requesting permission to do so. Unfortunately, I never heard back, and I’m not a recipe thief. This forced Mom and me to rework the recipe to our liking and present it as our own. Not a problem since we always tweak a new recipe the minute we find it anyhow.

The most important requirement: the cake had to taste homemade. You wouldn’t think that would be a difficult task since we weren’t using a prepackaged mix, but our cake had to capture the essence of the above-mentioned scene. How does one bake hope, beauty, richness, longing, humbleness, elegance, era, location, and love into a cake? Follow our recipe and find out.

Timeless Wedding Cake

3 sticks unsalted butter, softened

3 c granulated sugar (I used raw necessitating the need to pulverize the larger crystals in a food processor to ensure incorporation during the creaming process. Don’t skip this step; it’s worth it. You’ll be glad you did once you taste the cake.)

5 eggs at room temperature

3 c flour and more for dusting the cake pans

¼ t salt

2 t baking powder

½ c buttermilk at room temperature

½ c whole milk at room temperature

2 t vanilla extract –OR– 1 t vanilla and 1 t lemon

Preheat your oven to 350° F. Spray three nine-inch round cake pans with nonstick spray and dust evenly with flour. Make sure to coat all the edges, and tap out any excess flour.

In a stand mixer, cream the softened butter and sugar until it is very light in color and fluffy. Add the eggs one at a time taking care not to over beat after each addition or you’ll end up with a tough cake.

Combine the milks and vanilla in a glass measuring cup and whisk. Sift the flour, baking powder, and salt together. Add the dry ingredients to the butter/sugar mixture alternately with the wet ingredients. Begin and end with the dry ingredients. A rule of thumb for this process is to add one-third of the dry ingredients, one-half of the wet, another third of the dry, the remaining half of the wet, and the last third of the dry.

Mix on a medium speed until well combined, taking care to stop the mixer and scrape down the sides of the bowl as needed. Evenly distribute the batter between the three cake pans. The batter will be thick, almost like a pound cake batter, so use an off-set spatula to level the tops. All three cakes should bake on the same level of your oven, somewhere near the middle. Carefully shift position of the pans from front to back midway through baking.

Bake for 25 to 30 minutes, or until a knife inserted in the center of the cake comes out clean. The top of the cakes should not jiggle, and a light crust will have formed on the top. Cool for five minutes in the pans, and then remove the cakes to a wire rack to continue cooling.

Bourbon Soaking Syrup

1 c water

1 c raw sugar

2 T bourbon (I recommend Woodford Reserve)

Combine the sugar and water in a large saucepan and bring to a boil over a high heat. When at the boil, the syrup is done. Remove from the heat and stir in the bourbon. Set aside to cool. The syrup will thicken as it cools. Brush the cooled bourbon syrup on the top of the cooled cake layers.  If you like thicker syrup, cook longer until more water has evaporated, but take care not to burn the sugar, or it will taste scorched.

Buttercream Frosting

1 c unsalted butter, softened

3 c powdered sugar

2 t vanilla extract

2 T whipping cream

In a stand mixer, cream the butter with one cup of powdered sugar on a low speed. Scrape the bowl as needed and add the remaining two cups, one at a time. Increase the speed to medium and beat for three minutes. Mix in the vanilla and whipping cream. Beat an additional minute, adding cream by the tablespoon if needed, to achieve a spreadable consistency.  If you enjoy a thicker layer of frosting between your cake layers, consider doubling the recipe.

Assembling:

Place one layer of completely cooled, bourbon-soaked cake on a stand or plate and ice the top of the cake to the edges. Place the second layer directly on top of the first and repeat the icing process. Add the final layer of cake and ice accordingly. Use the remaining frosting to ice the sides of the cake. The bourbon soak will add a layer of flavor and keep the cake moist longer.

I knew we had achieved success with our recipe when my sister-in-law took a bite and said, “Oh…this just tastes old-fashioned.”

Enjoy!

The Music of Life

the-music-of-lifeSeveral years ago while shelving AV material at the library where I used to work, I came across a CD titled The Goat Rodeo Sessions. What caught my eye, besides the unusual title, was Yo-Yo Ma on the cover. I was familiar with Yo-Yo Ma as a classically trained musician, but here he was featured on a CD devoted to music of a completely different genre. Without hesitation, I checked out the CD and couldn’t wait to listen to it on the drive home. What I heard started a love affair with a type of music I’d previously tiptoed around.

Probably what kept me from exploring this genre earlier was the fact that much of it was labeled Bluegrass. My opinion of Bluegrass included all things twangy and hick-i-fied. Yes, that is a word. What I discovered that day was something called Classical Crossover. Classical Crossover is a genre that hovers between classical and popular music, and is usually targeted at fans of both types of music. In the most common type of crossover, classically trained performers sing or play popular songs, folk music, show tunes, or holiday songs.

Chris Thile, Edgar Meyer, and Stuart Duncan also contributed to the CD’s eleven tracks of music based on English and Irish fiddle music that gave birth to what we know as Appalachian fiddle music. The closest I’d ever come to anything like it was the little bits of fiddle I’d heard in songs by Clannad and The Chieftains.

After listening to The Goat Rodeo Sessions, I went in search of other CDs by the same artists or those featuring similar music. I discovered Appalachian Waltz, Short Trip Home, Appalachian Journey, and Heartland: An Appalachian Anthology all of which are now in a playlist that became the soundtrack of my mind as I wrote my novel, The Secrets of Dr. John Welles. One song in particular, “Sliding Down” featuring Béla Fleck, Edgar Meyer, and Mike Marshall, epitomized John Welles’s experience in the later years of his life.

By the time John lived in the Appalachian Mountains of West Virginia, his life had taken so many downward turns that he believed he’d never dig himself out from under them. Yet through it all, he retained a shred of hope buried deep in his heart. “Sliding Down” is the musical representation of what John felt during those years:  melancholy with a touch of optimism on the horizon that he was too afraid to reach for.

Other tracks from the above-listed CDs also played perfectly to the scenarios I wrote whether it was John as a boy on the family farm, as a student at the University of Maryland, during his relationship with the beautiful, enigmatic Garland, or the months following the D-Day Invasion. I don’t doubt that the music shaped what I wrote as if the songs were indeed a custom-made soundtrack. However, I finished writing over a year ago, so I haven’t accessed my Appalachian playlist in some time.

Last week, I had the opportunity to re-read To Kill a Mockingbird. It had been over thirty years since I had done so as an Honors English student in high school, but thanks to one of my book clubs, we revisited the classic. During one scene, Scout mentioned that Atticus liked listening to fiddle music on the radio. Suddenly my forgotten playlist rushed back to my memory. A quick check on Google confirmed that the Appalachian Mountains extend as far south as northern Alabama. As I read, all my favorite pieces became the background music for Scout, Jem, Dill, and Atticus’s adventures, and I listened to my playlist for two days straight.

By the way, the term goat rodeo refers to a chaotic event where many things must go right for the situation to work, a reference to the unusual and challenging aspects of blending classical and bluegrass music. Yo-Yo Ma described a goat rodeo saying, “If there were forks in the road and each time there was a fork the right decision was made then you get to a goat rodeo.” In the case of The Secrets of Dr. John Welles and To Kill a Mockingbird, the right choices weren’t always made, but somehow life worked out for the majority of those involved. This fact further reinforces my belief that the music of Appalachia is truly the music of real life.

All Aboard the Gravy Train

all-aboard-the-gravy-train-2Well-made gravy is food for the gods. Gravy deserves to be its own food group. In fact, I move that gravy receive as much recognition as the main courses and side dishes that end up on our plates. Naturally, gravy is mentioned in my novel, The Secrets of Dr. John Welles.

In the scene where Johnny’s Aunt Prudence barges in on the family as they’re sitting down to dinner, I wrote that Collie served mashed potatoes. Everyone knows that mashed potatoes can stand alone as delicious comfort food, but with the addition of gravy, it’s like eating the clouds upon which cherubs rest.

I’m going to focus on chicken gravy for the sake of this post because that’s the gravy accompanying the mashed potatoes in the above-mentioned meal. I prefer to use drippings directly from the chicken I’ve cooked, whether it’s a whole roasted chicken or baked thighs, but a can of quality broth can be substituted. The amount/size of the chicken you prepare will determine the quantity of drippings you achieve. This can be stretched especially if you’ve placed butter under the skin of your chicken or are using canned broth to baste.

all-aboard-the-gravy-train-1

Perfectly seasoned drippings waiting to be thickened.

As for seasoning gravy, I like to depend on how I seasoned my chicken. This will determine the flavor of your gravy. One of my favorite seasoning combinations that I use on a roaster or thighs, both beneath and on the skin, ensures delicious drippings for gravy:

1 t sea salt

¼ t oregano

¼ t black pepper

¼ t garlic powder

¼ t onion powder

¼ t paprika

¼ t thyme (not ground)

all-aboard-the-gravy-train-3Collect the drippings from the baking dish or pan you cooked in and be sure to strain it through a fine mesh sieve. Place the drippings in a saucepan over a low heat.

My preferred thickener for meat dripping based gravy is corn starch. Sometimes flour is too lumpy, tastes too pasty, and looks too cloudy. Also, you can use less corn starch than flour when thickening which means fewer calories.

Always mix the cornstarch in equal proportions with a cold liquid, milk or water, and stir thoroughly to prevent lumps before whisking into the hot drippings. Cornstarch placed directly in hot drippings will seize up and create inedible food glue. The rule of thumb is two tablespoons of cornstarch per cup of liquid to attain a gravy-like consistency.

Stir constantly and bring your mixture to a boil. Boil for one minute. Season with additional salt and pepper if needed.

When using canned broth, the same seasoning will flavor the broth nicely. Opt for a low-sodium variety since you’ll be adding salt. Thicken in the same manner, just remember to strain out the large particles of oregano and thyme.

Enjoy!

Do The Mash

do-the-mash-1Mashed potatoes figure in to my novel, The Secrets of Dr. John Welles, in a couple places. As I mentioned when I started Edible Fiction, I love to feed people whether real or imagined. For real people, it’s because I enjoy watching them appreciate what I’ve prepared. For my characters, I have discovered that food is an extension of the scene taking place and/or their personalities.

For Marian Watley Welles, wife of Johnny’s older brother, James, she attacked several mounds of mashed potatoes tipping off her mother-in-law, Collie, to the fact that she was pregnant. In fact, Collie’s suggestion to have another helping and Marian’s willingness to comply was what made Collie so sure of her daughter-in-law’s pregnancy. What hungry first-time mother could resist one of the ultimate comfort foods?

Another instance where I employed mashed potatoes was during Prudence’s first visit to the Welles Family Farm. Along with the other items Collie prepared for dinner, mashed potatoes featured on the menu. I wished to convey a homey setting complete with all the family favorites. Prudence forced herself into this scenario, upsetting the Welles Family, because deep in her heart, it’s what she longed for.

A high starch potato like Yukon Gold or Russet makes the fluffiest, smoothest mashed potatoes. They absorb flavors well (chicken broth when boiling, dairy when mashing). Avoid waxy potatoes like Red Bliss or fingerlings which have a tendency to turn gummy or gluey upon mashing. Choose one large potato per person when deciding upon quantity. I include one or two extra potatoes in case someone wants seconds or leftovers.

I didn’t used to believe it myself, but salting the water truly makes a difference. It’s the first step toward seasoning, so don’t skip it. Also, start with cold water to ensure even cooking. On the other hand, when adding your butter and cream, they should be warm. I do this in the cooking pot while my cooked potato chunks are draining in a colander. Your potatoes will absorb all the deliciousness of the dairy and you’ll have to work them less to incorporate the butter and cream. This means lighter, creamier potatoes.

Weapon of Mash Destruction

Weapon of Mash Destruction

And since we’re on the subject of overworking mashed potatoes, put down the hand-held mixer, place the food processor back on its shelf, and tell your standing mixer you’ll see it later. These devices are too aggressive and will turn your potatoes into grainy food glue. Pull your potato masher from the drawer and gently mash your potatoes. Remember, lumps are not a bad thing in mashed potatoes; they add to the homemade quality. If you insist on completely smooth taters, non-electric ricers or food mills are the only acceptable, alternative tools.

Perfect Mashed Potatoes

Yukon Gold or Russet Potatoes

1 stick unsalted butter (This quantity for a full pot. Adjust to taste as needed.)

Sea Salt

Freshly cracked pepper (I use quad-colored peppercorns.)

Whole milk or heavy cream (Amount of liquid also dependent on quantity of potatoes.)

Choose one large potato per person. Fill a large cooking pot with cold water and about a teaspoon of salt. Wash, peel, and cut the potatoes into evenly sized chunks. Place the chunks into the water while working to keep the potatoes from turning brown or gray.

Bring the water to a boil and cook the potatoes until the biggest chunk is tender. Pierce with a paring knife to check for doneness. Drain the potatoes but do not rinse.

Melt the butter in the pot over a low heat and stir in the milk or cream. You may need to adjust the liquid based on the quantity of potatoes, but keep in mind that you want the potatoes creamy without being too dry or too runny.  Add the cooked potatoes to the butter and milk or cream.  Mash gently with a hand-held potato masher.

Season with salt and pepper. Transfer to a serving bowl.

Enjoy!

do-the-mash-3

Two Peas in a Pod

two-peas-in-a-podLike most children, Johnny Welles at twelve was rather oblivious to the world of adults going on around him. His life on the farm with his family consisted of happy days in which he lived secure in the knowledge that he was loved. And then his drunken father decided to return.

The devastation John Welles the elder inflicted upon the family would affect all of them for many years but Johnny most of all. Little did he know that help would come from an aunt he barely knew. His father’s sister, Prudence Welles Mayfield, supplied the much needed means of escape that would set Johnny on the course to becoming a doctor.

Prudence arrived at the farm just as Collie was setting dinner on the table. Without waiting for an invitation, she seated herself, dug in to Collie’s excellent cooking, and proposed the plan that would change Johnny’s life. One of the items on the menu was black eyed peas. The following recipe is the one I had in mind when I wrote the above-mentioned scene.

Black Eyed Peas

1 lb. dried black eyed peas

2 T unsalted butter

6 – 8 oz. pork shoulder, diced into 1/2-inch cubes

6 strips thick sliced bacon, cut into 1/2-inch pieces

1 medium onion, diced

5 garlic cloves, pressed

1 1/2 t salt

1 t freshly cracked black pepper (I used quad-colored peppercorns)

1/2 t crushed red pepper

6 cups chicken broth (I prefer low-sodium, low-fat broth)

2 bay leaves

Place the dried peas in a colander and swirl around to remove any loose shells or debris. Be sure to sift through with your fingers to remove larger unwanted particles. Place the peas in a large pot and cover with four inches of water. Soak them overnight, then drain the water and rinse the peas in a colander.

(Quick Soak: Sift the peas for debris, bring them and the water to a boil, cook for two minutes. Remove from heat, cover and soak for one hour. Drain and rinse. They are ready to use.)

Rinse and wipe the pot the peas were in then melt the butter. Add the pork shoulder to the pot and brown on all sides until there is a nice sear on the meat and brown bits formed on the bottom of the pot. Add the bacon, onion, and garlic, and cook until the onion has browned, almost caramelized. Be sure to scrape the browned tidbits off the bottom as it cooks.

Add the seasonings to the pot, being sure to coat the meat and onion evenly, and cook for about two minutes. Add the six cups of chicken stock and bay leaves. Bring the mixture to a boil, then reduce to a simmer, cover, and cook for about thirty minutes. When the pork becomes tender, add the peas to the pot and simmer until they are very soft, about 1 – 1 ½ hours. When the peas are finished cooking, you can purée one cup of peas and broth and return to the pot if you desire an even creamier consistency.

When finished cooking, remove the bay leaves and transfer the peas to a serving bowl. Vinegar, especially the hot-pepper variety, is often a condiment for this dish. There are also many stir-ins that people add based on the version of black eyed peas they grew up with. Consider a stalk of celery, a chopped red or green pepper, or corn during the cooking process. Some recipes even call for cooking with the bone from the pork shoulder.  Remember to remove it prior to serving.

Enjoy!

Getting Out of a Sticky Situation

getting-out-of-a-sticky-situationGladys Feldman, mother to Sam, is determined to make the holidays happy for one of her son’s best friends, Claude Willoughby. Sam and John are also trying to cheer up their friend who has been left in Maryland as punishment while his family returns home to Kentucky to celebrate Christmas.

What the trio comes up with is an after-the-fact Chanukkah party to lift Claude’s spirits. Gladys invites her son’s friends over for a meal of brisket and latkes. As delicious as the meal is, the real fun doesn’t begin until she guides them through the process of making sufganiyot, and all four end up in a friendly powdered sugar fight before settling down to play dreidel.

The following recipe is the one I had in mind when I wrote the scene above. Sufganiyot are traditionally served at Chanukkah, but they are so easy to make that you’ll probably want to sample them a couple times throughout the year.

Enjoy!

Sufganiyot

1 package active dry yeast

1 teaspoon granulated sugar

¼ cup granulated sugar

3 ¾ cups all-purpose flour

¾ cup whole milk

6 tablespoons unsalted butter

1 teaspoon salt

½ teaspoon ground nutmeg

2 large eggs

4 cups vegetable oil, for frying (I used canola)

1 cup seedless red raspberry jelly or other favorite jelly flavor

Powdered sugar for sprinkling

Mix the yeast, one teaspoon granulated sugar, and ¼ cup warm water (105 to 115 degrees F) in a large bowl (preferably not metal). Let stand until yeast mixture foams, about five minutes.

With a wooden spoon, stir flour, milk, butter, salt, nutmeg, eggs, and remaining ¼ cup granulated sugar into yeast mixture until evenly blended. The dough will be very sticky. Cover the bowl with a clean cloth towel, and let the dough rise in warm place (80 to 85 degrees F) until doubled, about 1 ½ hours.

With floured hands, punch down the dough. Turn the dough onto a heavily floured surface, and let rest ten minutes. With floured hands, pat the dough ½-inch thick. With a floured, three-inch round biscuit cutter, cut out as many rounds as possible. Place the rounds, about two inches apart, on lightly floured cookie sheets. Gently press any trimmings together. Repeat steps above. Cover the rounds, and let them rise in a warm place until doubled, about one hour.

In a ten-inch skillet, heat the oil over medium heat until the temperature reaches 375 ° F on a deep-fry thermometer. With a wide metal spatula, carefully place two or three doughnuts in the hot oil. Fry until golden brown, about 1 ½ minutes, turning over once. With a large slotted spoon, transfer doughnuts to wire racks lined with paper towels to drain. Repeat with the remaining dough rounds.

When the doughnuts are cool enough to handle, using a small sharp knife, pierce the doughnuts from one side almost to the opposite side. Place the jelly in a decorating bag fitted with ¼-inch round tip. Squeeze a small amount of jelly into each doughnut through the slit. Cool the doughnuts completely on a wire rack. Sprinkle doughnuts with powdered sugar to serve.

By the Light of the Silvery Moon

by-the-light-of-the-silvery-moonJohnny Welles believed the only thing he had in common with his father was a name. The elder John Welles, although present in body, was deficient in every way possible in his youngest son’s life. His father left the parenting of Johnny and his three siblings to their stepmother, Collie. While Collie’s influence in their young lives kept them on the straight and narrow path, their father’s absence had a negative impact, especially on Johnny. The effect would have far-reaching consequences and make Johnny question as an adult which was stronger in his life: nature or nurture.

John Welles the elder’s downfall was the result of his predilection for alcohol. His poison of choice, moonshine, also known as white lightning, hooch, homebrew, mountain dew, white whiskey, and white liquor, is a high-proof, distilled spirit often produced illegally from unlicensed stills. The liquor, rarely aged in barrels and coming in at 190 proof, is typically made with corn mash.

One source stated that the term moonshine came from moonrakers, used for early English smugglers and the clandestine nature of the operations of the illegal Appalachian distillers who produced and distributed whiskey. Another stated that it was due to the fact that distillers always worked at night. I suspect it’s a little of both.

Despite its illegal status, or perhaps because of it, John Welles the elder managed to make just enough money to indulge in his favorite addiction to his own detriment and that of his family. So why was moonshine illegal then and still today? Per Michelle Tsai’s 2007 post, Why is Moonshine Against the Law?:

Because the liquor is worth more to the government than beer or wine. Uncle Sam takes an excise tax of $2.14 for each 750-milliliter bottle of 80-proof spirits, compared with 21 cents for a bottle of wine (of 14 percent alcohol or less) and $.05 cents for a can of beer. No one knows exactly how much money changes hands in the moonshine trade, but it’s certainly enough for the missing taxes to make a difference: In 2000, an ATF investigation busted one Virginia store that sold enough raw materials to moonshiners to make 1.4 million gallons of liquor, worth an estimated $19.6 million in lost government revenue. In 2005, almost $5 billion of federal excise taxes on alcohol came from legally produced spirits.

If it weren’t for the harmful effects the high proof and often poorly produced liquor has on people, I’d vote in favor of the moonshiners as our government has done such a pitiful job of handling our taxes and doesn’t deserve any more of our money.